Sunday, September 25, 2022

Hey Ghoul Friend

Hi friends! Welcome back to my blog. I've been away for a little bit...lots happening in the family. I've had a chance to play with A Colorful Life Design's Marvelous Masks Ghosts. There are 8 pieces positive and negative. And eyes are separate, so I was able to use a black sparkle texture paste for that sparkle.
These are quick and easy cards. I used Lawn Fawn's Black Licorice Card Stock for the base and ink blend over the stencils with Scrapbook.com's White Pigment Ink and an ink blending sponge.
These are so fun  - with the smaller ghosts just turn them here and there so it looks like ghosts flying everywhere!
Here I only used the largest one. So cute!
The sentiments are from Hero Arts Greetings Halloween and Autumn Messages. White heat embossed with embossing powder in my stash. I have so many different ones and just use whatever is closest.
The eyes are created after the ghost is created - I used Cosmic Shimmer Sparkle Texture Paste in Midnight with a palette knife.
I think they are really cute and there are 2 other sizes I didn't even play with yet!
Thank you for joining me today and if you want to pick up this set of stencils or any other of the awesome stencils from A Colorful Life Designs with my discount code AnitaFan10 for 10% your entire order (excluding bundles).
I will be submitting to:


*Some of the links in this post are affiliate links. This means if you click on the link and purchase the item, I will receive a small affiliate commission at no extra cost to you. All opinions remain my own.

Saturday, September 10, 2022

Halloween is coming!

Hello friends, I know it's early but in the card making world it's time for Halloween and all things spooky and kooky!
I've used a couple of my much loved stencils from A Colorful Life Designs, Kitty Face Stencil and Creepy Branches Stencil. Don't forget to use my discount code: AnitaFan10 for 10% off your stencil order at A Colorful Life Designs, too!
Creepy Branches Stencil has 2 parts - the positive and negative:
Here are all the fun Spooky and Kooky cards made with these stencils:
This Paper Artsy Zinis ZN07 is sooo cute and not too spooky!
I very seldom use 3D wooden embellishments that are premade, but the ghost from Spellbinders' Fun Stampers Journey B&W Halloween was perfect to complete this card:
I used Scrapbook.com's Premium Pigment White for all the ink blending:
These little cuties are from MFT's Boo Crew (retired):
This little scary guy is from Brutus Monroe's Spooky Kids set (retired):
I love the little spider on the BOO!
Inside sentiment and spider is from Tim Holtz's Stampers Anonymous Halloween Cutouts.
I hope you enjoyed my Halloween cards! Some of the additional products I've used here are:
3) My Favorite Things Stamps - Boo Crew - retired
5) Spellbinders' Fun Stampers Journey Costumed Cuties - retired
6) Brutus Monroe Spooky Kids and Coordinating Die - retired

I will be submitting to:


*Some of the links in this post are affiliate links. This means if you click on the link and purchase the item, I will receive a small affiliate commission at no extra cost to you. All opinions remain my own.


Wednesday, September 7, 2022

Checking His List

Welcome to September 2022's Paper Funday Challenge! One of our generous sponsors this month is QKR Stampede and I chose Gnome Man Digital Stamp. How cute is he?
I colored him 3 times. I usually resize a digital stamp for 3 images onto one piece of Ranger's Tim Holtz's Watercolor Paper 8" X 10" size. So then I have 3 to color and practice. For this image I used the Daniel Smith Watercolor 238 Watercolor Dots Card:
For this image I used Altenew's Watercolor Brush Markers:
One, two, three and I have 3 more Christmas Cards done! Digital images are a really quick way to mass produce cards. I color at lunchtime at work and they are easy to carry and store. Which is your favorite?
Hope you've enjoyed this post and I love to see what you create for The Paper Funday Challenge this month!
*Some of the links in this post are affiliate links. This means if you click on the link and purchase the item, I will receive a small affiliate commission at no extra cost to you. All opinions remain my own.

Tuesday, September 6, 2022

New Design Team!

I have been a fan of the Happy Little Stampers Challenges for a long time. When I saw they were looking for Design Team members I had to apply to the Stencil Team and they accepted me!
Anything Goes With a Stencil Challenge, which is my favorite, for I have so many ideas and want to use all the products I have in my stash! As you may or may not know, I am also on the Design Team for A Colorful Life Designs, a small business, woman owned stencil company located in Texas. Perfect match!
If you are looking for a good selection of stencils, you can't go wrong with:
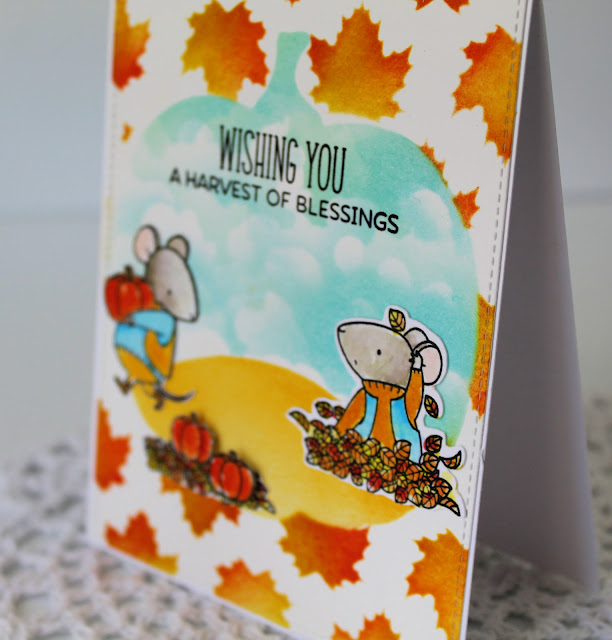
But let's get onto my card for my first Design Team submittal! I used 3 stencils from a Colorful Life Design and layered them:
Marvelous Masks Pumpkin Stencil is a set of 4 pumpkins, both positive and negative - which I absolutely love!
I used the largest pumpkin (upper left hand image) and used a little Pixie Spray on it. I placed it on my card front panel and pressed it down with my Tim Holtz's brayer. Next, I placed the Maples Leaves Stencil over the card front, right over the pumpkin mask.
Then I just ink blended with Ranger's Distress Ink in Wild Honey, Squeezed Lemonade and  Carved Pumpkin. Then I gently removed both stencils and used the curve of one of the Marvelous Mask Pumpkin Stencil to make the hill in the open pumpkin space. I left it in place and then used the Cloud Edger Stencil with Ranger's Distress Ink Tumbled Glass.
Sounds complicated, but it's really about layering and making sure you have what you don't want overlapped covered up:

These stencils set the scene for the cute cute images from My Favorite Things BB Harvest Mouse:
I stamped them on Ranger's Tim Holtz's Watercolor Paper and water colored with the Distress Inks smooshed onto a palette. I don't have the coordinating dies, so I cut them with my Brother Scan 'n Cut. I did still have to fussy cuts parts that I didn't like how they were cut. You can see I have a border on one but not the other.
I hope you've enjoyed my post and if you are interested in purchasing from A Colorful Life Designs please use my link and discount code: AnitaFan10 to received 10% your entire purchase (excluding bundles).
Hope to see on the Happy Little Stencil Challenge!
Some of the links in this post are affiliate links. This means if you click on the link and purchase the item, I will receive a small affiliate commission at no extra cost to you. All opinions remain my own.